Showing posts with label Windows 8 Guide. Show all posts

Tuesday, March 26, 2013

Windows 8 Manual in PDF Format

Download latest Windows 8 Manual Documents in PDF files:

Windows 8 Versions

  • Windows 8 - Windows 8 is the basic edition of Windows for the x86 and x86-64 architectures. This edition contains features aimed at the home market segment and provides all of the basic new Windows 8 features including the Start screen with semantic zoom, live tiles, Windows Store, Internet Explorer 10, connected standby, Microsoft account integration, the Windows desktop and more.
  •  
  • Windows 8 Pro - Windows 8 Pro is comparable to Windows 7 Professional and Ultimate and is targeted towards enthusiasts and business users; it includes all the features of Windows 8. Additional features include operating as a Remote Desktop server, the ability to participate in a Windows Server domain, Encrypting File System, Hyper-V, and Virtual Hard Disk Booting, Group Policy as well as BitLocker and BitLocker To Go. Windows Media Center functionality will be available only for Windows 8 Pro as a free “add-on.”
  •  
  • Windows 8 Enterprise - Windows 8 Enterprise provides all the features in Windows 8 Pro (except the ability to install the Windows Media Center add-on), with additional features to assist with IT organization (see table below). This edition is available to Software Assurance customers, as well as MSDN and Technet Professional subscribers, and was released on August 16, 2012.
  •  
  • Windows RT - Windows RT will only be available pre-installed on ARM-based devices such as tablet PCs. It will include touch-optimized desktop versions of the basic set of Office 2013 applications to users—Microsoft Word, Excel, PowerPoint, and OneNote, and support device encryption capabilities. Several business-focused features such as Group Policy and domain support are not included.

Sunday, March 10, 2013

Windows 8 Start screen: Coping strategies

Windows 8 Start screen: Coping strategies

As of today, I have been using Windows 8 as my main operating system for exactly one year. I have used Windows 8 to play games (Diablo 3, Civilization 5, DOTA 2), edit photos and videos (Audacity, Photoshop, Premiere Pro), listen to music (Foobar, Spotify), and surf the web (Firefox, Chrome, IE).

For the most part, the experience has been surprisingly good. I’ve had a few driver issues, and a few odd compatibility issues (chiefly Firefox and the Adobe suite), but ultimately it has felt like I’ve just been using an updated version of Windows 7 – an updated version of Windows 7 that does away with the Start menu and introduces the abominably god-awful mouse-hating “Metro” Start screen.

Ah, the new Start screen. Over the last 12 months, it has become almost universally acknowledged that the formerly-known-as-Metro interface (let’s just call it Metro) is lovely on a touchscreen – but with a mouse and keyboard, it’s like trying to eat M&Ms with oven mitts. With no easy way to manipulate it using a keyboard and a horizontal scrolling paradigm that scorns your mouse, it’s plain to see that Metro simply wasn’t designed for those couple of billion PCs that run Windows XP, Vista, and Windows 7.

I say “almost universally acknowledged” because I don’t agree; I actually like using the Metro interface with a mouse and keyboard. For 12 months I have been using Windows 8 and the Metro Start screen on a dual monitor setup – the worst possible setup for monogamous monitor Metro apps – and I can’t see what all the fuss is about. Really, it seems like tech writers and pundits are whining for the sake of hyperbolic titles and a large number of page views – or perhaps they simply haven’t tried the Metro Start screen for a prolonged period of time.

You see, if you use Windows primarily for Desktop apps (i.e. you use a mouse and keyboard), you will only see the Metro interface on two occasions: When you first log in, and if you need to search for an installed application. In the latter case, I won’t deny that it’s a wee bit jarring the first few times you flip to the Metro interface, but you do get used to it – and there’s no doubt that the new Start screen offers a much better search experience than the Start menu.

The first case, though – being forced to use the Metro interface after you log in – is by far the most common complaint when it comes to Windows 8. Again, if you’ve ever used Windows 8 for more than a few days, you will realise this is a non-issue.


Avoiding the Metro Start screen

When you log into Windows 8, you are greeted by a Start screen populated by live tiles (constantly updating icons that hook into Metro apps) and conventional icons. In the screenshot above, most of the buttons on the left are live tiles, and most of the buttons on the right are conventional icons. Now, get this: If you click one of the icons – for Filezilla or Photoshop, say – the Start screen automatically closes and the program opens up.

In my case, the first program I open every morning is Filezilla – so I log in, the Start screen appears, I click Filezilla… and that’s it. On a normal day, that is the sum total of my interaction with Metro. On a bad day (when I need to access an app that isn’t pinned to my taskbar), I hit the Windows key, type a few letters, and hit Enter to open a program.

Take a moment to think about that: To hide the Start screen, all you have to do is click a nice, large icon.

Removing the Windows 8 Start screen entirely

If seeing the Start screen once is still too much for your weak constitution, there’s another solution that automatically opens the Desktop after logging in. Simply add “C:\Windows\Explorer.exe” (without the quote marks) to your registry in the following location:

HKEY_CURRENT_USER\Software\Microsoft\Windows\CurrentVersion\Run.
This is very easy to do using Regedit

If you don’t want to mess around with your registry, RetroUI (which costs £3) does the exact same thing for you, with the added bonus of letting you disable some other Windows 8 features, too (Charms, hot corners). Ultimately, any Desktop program that executes after logging in will automatically hide Metro.

So, there you have it: Yes, Microsoft doesn’t seem to care that the Start screen is painful to use with a mouse and keyboard – but no, the retirement of the 17-year-old Start menu won’t actually affect your everyday usage of Windows 8.

Even if you’re still convinced that the Start screen will completely ruin the Desktop experience, please try to remember that Windows 8 is significantly faster and more efficient than Windows 7 in terms of CPU, RAM, and I/O usage – and a bunch of default tools, such as Explorer and Task Manager have received some really nice tweaks, too. Additions like performance monitoring don’t go amiss, either.

How to customise Windows 8


Microsoft's operating system isn’t even fully released yet, but with Windows 8 Release Preview (and, if you're a developer, Windows 8 RTM), we’ve already got a good idea of the many ways in which the new OS can be dolled up. In fact, one of the standout revelations of RTM was the new "tattoos" that can add personalised flourishes to your Start screen background. 

The new tattoos are only the latest additions to the many personalisation options Windows 8 already boasted in previous pre-releases. In fact, the very first choice in Windows 8's PC settings page is "Personalise," where you can make the Lock screen, your account picture, and Start screen reflect your own style.

Windows 8 also inherits many of the customisation options that were available in Windows 7, in the newer OS's desktop mode. Not only can you choose a desktop background, screensaver, and system sounds, but you can also take advantage of downloadable Themes, including some that are dynamically updated throughout the day. And you can now sync your customisations among all Windows 8 PCs you sign into.

There are already some third-party tools out there which offer Windows 8 customisations, but since there's so much you can do with nothing but the operating system’s built-in tools, this collection of customisation tips will concentrate purely on those. If you haven't already downloaded the Windows 8 Release Preview, you can do so and install it on any computer capable of running Windows 7. For a complete overview of what's new in the OS, read our First Look at Windows 8 RTM article.

1. Lock screen picture

The first thing you see when you power up your Windows 8 PC or tablet is the Lock screen. This is a familiar concept for smartphone users, but it's a new one for PCs. Let the first thing you see be something you love. Windows 8 RTM has six cool choices for this. The default is a Seattle scene showing the Space Needle, a mountain, and a green hill. The other appealing options include a honeycomb, a nautilus, a piano keyboard, train tracks in a city, and prisms of colour. To get to this option, simply choose the Settings charm from the Start screen, Change PC settings, Personalise, and then Lock screen.

2. Lock screen apps

The Lock screen isn't just a static picture waiting for you to log in. In addition to indicating battery level along with the date and time, it can display useful information such as the number of email messages awaiting you, the current weather, and calendar appointments and reminders. It isn’t just built-in apps that have the ability to display pithy information on the Lock screen, but third-party apps like Twitter clients and messaging apps can, too. You can also specify an app that will display detailed status information on the Lock screen. The only default choices for this in RTM were Weather and Calendar.

3. Start screen colour and tattoos

From its first pre-release version, Windows 8 offered a few background and foreground colour combinations for the Start screen, and this is the first choice you make on your initial run of the OS after installation. With Release Preview, Windows 8 offers 25 different colour combinations for your Start screen – enough for every taste. Note that your colour choice also affects the charms, your tattoo choice, and even the Windows logo itself, which has been redesigned to be colour-agnostic.


Prior to the arrival of Windows 8 RTM, you could grace the background of your Start screen tiles with a few mild patterns, but with RTM, the choices for these "tattoos" exploded into phantasmagorias of design and colour. The milder options are still available, but now you have 20 total tattoos to choose from, with some real doozies among them, some sporting flowers, planets, gears, guitars, or creatures. Now, the selection can truly be considered artistic. To get to this option, simply choose the Settings charm from the Start screen, Change PC settings, Personalise, and then Start screen.

4. Tile sizes

One of the first things you'll notice on the Windows 8 Start screen is that some of the app tiles are twice as wide as others. Don't agree with the default sizes? No problem. Just right click on a tile (or hold your finger on it and drag up or down if you’re using a touchscreen), to display the tile options. If the tile is the larger size, you'll see a "Smaller" button, and vice versa for a large tile. Other choices here include unpinning the tile from the Start menu, uninstalling the app, and turning off its live updates.


5. Group and re-arrange tiles

There are plenty of ways to arrange your Start screen tiles to taste: Simply click and drag a tile to change its position on the screen (or hold and drag on a touchscreen). For more global changes, you can pinch to zoom out (or Ctrl-mouse wheel), making your whole screen shrink, with all tiles on multiple screens visible. From this view, you can move and even name groups of tiles.


6. Account picture

In Windows 8, your user picture is always staring up at you from your login screen and from the top right of the Start screen. Why not make sure you use a good one? From the PC Settings/Personalise page's Account picture tab, you can either shoot a photo from the PC's built-in webcam, or choose any image file in a folder on the PC.

7. Customise your default apps

Microsoft's operating system comes with several new-style apps, which you can modify to your own needs and interests. Four in particular lend themselves to customisation – News, Finance, Sports and Weather. As with most new-style Windows 8 apps, you reach the customisations by right clicking on the program's running screen, or, if you're using a touchscreen, by swiping in from the top or up from the bottom of the display. With any of these apps, you can pin a particular set of content to the Start screen, rather than just the general app. For example, in the Sports app, you can pin a version just for your favourite team.

8. Notifications

Windows 8 features new "toast" notifications that appear temporarily at the top right of the screen when an app or the system has a message for you. So, for example, when an app has been successfully installed, or you've received an instant message. From the Settings charm, choose Change PC settings, then Notifications. From this settings page, you can turn notifications from every app capable of sending them on or off, or indeed turn all of them off at once. You can also mute the notification sound if you prefer.

9. Desktop background

A fair portion of the desktop customisations that existed under Windows 7 remain in Windows 8's desktop mode. You can change the background (aka "wallpaper"), colour, sounds, and screensaver. There are still Themes, including some with live-updated RSS themes (the ones featuring the wonderful daily Bing photos are favourites). What's new is that these theme choices can be synced with any other Windows 8 PC you log into.

10. Taskbar options

The Windows 8 desktop taskbar has been flattened – there’s no more 3D translucent Aero look and feel – but you can still do a lot to customise it. Just right click on the taskbar, and choose Properties. Nearly all of the old reliable Windows 7 options are still available. You can change its position from the bottom to the top or either side, auto-hide it, change to small buttons, and “un-combine” a program's windows.


You can even add toolbars to the taskbar for addresses, links, the touch keyboard, or for Desktop access. This last one will be of great interest to those who lament the loss of the dear departed Start button – it grants access to not only the desktop icons, but also Libraries, My Computer, Control Panel, and more.

Starter guide for Windows 8

A starter guide for Windows 8

Windows 8 has been out for a few months now, and tens of millions are already or soon will be using it as their PC operating system. With the long-in-the-tooth but still heavily used Windows XP set to have its support expire next year, a vast horde of Windows users will likely move to this entirely re-imagined version of Microsoft's operating system. It's that re-imagining that may throw off some long-time Windows users, so we've come up with some pointers to ease the transition.

A key thing to remember is that although the startup screen will look vastly unfamiliar to veteran Windows users, the new operating system's desktop view is accessible from the tile displaying the desktop (aka wallpaper). This will shift you back into a warm and familiar setting, though one that's improved in several ways. One thing Windows users won't miss is the long time it takes to boot up the operating system from power off. And it's not just boot performance: "Windows 8 speed tests: It's faster at pretty much everything" 

In addition to these speed boosts, Windows 8 also improves tools like Task Manager, file transfer dialogs, and its new version of Internet Explorer can hold its own against competitors like Chrome and Firefox in both speed and support for new web standards like HTML5. But since it's Windows, you're still free to run those competing browsers – and millions of other programs, of course.

So without further ado, here's our starter guide on how to get rolling with Windows 8 in style and comfort, and with a minimum of fuss.

1. Edges and corners

Remembering just two interface procedures can do more to get you fluent in Windows 8 than anything else: If you're working on a touchscreen, swiping in from the edges should become second nature, to get you back to the Start screen, to search, to change settings, and more. Working with a mouse, the corners of the screen are the keys to the interface. The corners on the right side invoke the Charms, and the left corners let you switch between apps, the desktop, and the Start screen.

2. The Start screen: Just start typing

A lot of users are taken aback by the completely new-fangled screen that displays on first boot-up of Windows 8. But just thinking of it simply as a full-screen start button panel will allay some of your fears. Just as with Windows 7's start button menu, you can simply begin typing the name of a program to display app names that match the letters you're typing. If what you're looking for isn't there – say, you want to run the control panel – switch the right side selector bar to Settings. If you're looking for a picture or doc, switch it to Files. Note that you can also search within any of the apps listed below these three choices.


Win 8 start screen

By just typing, you can find both new-style and traditional desktop Windows apps, which also get tiles on the Start menu when you install them. And tiles can represent other things besides apps: They can represent specific people for contact info, sections of apps such as a specific team in the Sports app, or a symbol in the Finance app. Also, they can simply be links from the Start screen to a favourite web page.

A sub-tip here is to organise your Start screen using semantic zoom – just pinch in on the screen if you're using a touchscreen or touchpad, or hit Windows Key-Minus Sign to shrink the tiles, right click or swipe down, and then you can name and move groups of tiles. Moving individual tiles is easy, too: Hold them down (or right click with a mouse) and drag them to the target location.

3. App up: Visit the Windows Store

And visit it frequently, since new apps are arriving by the thousands every month. Sure, you may still mostly want to use your PC for traditional desktop-style applications, but why not take advantage of these lightweight, mobile-esque apps that are quick to install and update automatically through the store. As with Apple's iTunes store, the Windows Store lets you see top free and paid apps, and categories like Games, News, Music, Photo, Entertainment, and Productivity. Most apps, many of them very useful, are free, and most of those that cost money are priced very reasonably, generally under a tenner and sometimes only a quid or so.

One app in particular is worth further discussion and that's Skype. The Messaging app in Windows 8 draws on Windows Messenger (it also works with Facebook messaging), but the MSN/Windows Messenger service is going to be retired in March. Prepare for this change by installing Skype, which will replace it. Skype is one of the better things to come out of Internet technology advances over the past decade, allowing far flung face-to-face conversations. You can also use it as a telephone substitute, via apps for all the big mobile platforms, and it offers a cheap way to make calls to regular phone numbers.

4. Take advantage of SkyDrive

The cloud has been all the rage for at least the last two years, even before Apple's late 2011 launch of iCloud. SkyDrive gives PCs equal footing when it comes to cloud conveniences. If you sign into your PC with a Microsoft account – which is highly recommended, since you can't use the Windows Store or take advantage of other integrations if you don't – your SkyDrive account is included into the bargain. Not only does SkyDrive serve as backup for PC settings, and as online storage and syncing, but third party new-style Windows apps can use it as though it were just another hard drive on your PC.

SkyDrive can also serve as a Dropbox-style syncing service, but this requires installing its desktop client. Yes – as with Internet Explorer, there are two guises of SkyDrive on Windows 8 – new-style and desktop style. When used this way, SkyDrive can serve as an online backup for your important documents, photos, and anything else you save to synced folders.


A final SkyDrive sub-tip is that in order to have passwords synced, you must "Trust" the PC. Do this by tapping or clicking on the Settings charm, then Change PC Settings at the bottom, and in the Users section, click "Trust this PC." This will open your Microsoft account in the web browser, where you can request a verification code that will show up on your cell phone or email account you specified as a trusted alternate contact. Note: My work spam guard filtered this, so you may have to dig to find it.

5. Install drivers

My test Windows 8 laptop is a stunner. It's a svelte Samsung Series 9 that can match any MacBook Air in terms of a slim, lightweight design. But even though it features a state-of-the-art touchpad, I could barely do anything with that input device – no two or three-finger scrolling in particular. When I asked Windows to check if the driver was up to date, it said yes. But a visit to the hardware maker's site, a download, and an install got all my multi-touch goodness working; so be sure to do the same yourself if you have any such issues.

6. Set up a Picture Password or PIN

In a technique drawn from the mobile world, Windows 8 normally requires you to authenticate yourself as a valid user each time the OS fires up, even after just sleeping as opposed to a full restart. Touch tablet users can set up a picture password for this operation, which is a reasonably easy way to get back into your machine. But I've found that even on desktops, creating a PIN lets you get back in much quicker. Setting either up is a simple matter of tapping the Settings charm, then Users, and then you'll see the choices under "Sign-in options."

7. Multi-boot with Windows 7

Setting up your PC to multi-boot with the more familiar Windows 7 kept as an option is a snap. This way, you can compare and test the waters of the new Windows before completely burning the Windows 7 bridge. When you boot the computer, you'll see a screen offering very clear choices for Windows 7 or Windows 8. I have previously published a guide on how to multi-boot Windows 8 like so. However, be warned that the Windows 8 installer only allows multi-boot with Windows 7 – for other operating systems, you'll have to turn to a utility such as NeoSmart's EasyBCD.

8. How to shut down new-style apps

In the early preview versions of Windows 8, there was no way to fully close running new-style apps, since the OS developers figured that there was no need to do so, since these apps made no appreciable CPU or system memory usage while not displaying. With the released version of Windows 8, however, there are a few ways to fully close new-style apps. That's a good thing, since you may not want to flick or Alt-Tab through dozens of apps to get to the one you want.

On touchscreens, simply swipe down from the top of the screen all the way to the bottom, and the app's window will shrink until it disappears. The same gesture works with a mouse: When you place the cursor at the top edge of the screen, it changes to a hand; dragging this down closes the app. A simpler keyboard method is to simply hit Alt-F4 – that's right, the same way you've been able to close applications for over a decade. Finally, you can head to the Task Manager (just type "task" from the Start screen), select the app, and click the "End task" button.

9. Use the Windows key

The Windows key already did a lot of useful things in Windows 7, though many ignored it anyway, and the Ctrl and Alt keys tended to get all the love. In Windows 8, the Windows key not only invokes the Start screen (and then takes you back to your application when hit again), but in fact, it can perform nearly all the new interface's functions, including displaying the Charms, snapping programs to the side of the screen, and more.

This thoughtful keyboard support should help dispel the myth that Windows 8 is only for touchscreen PCs. Here are a few Windows key pointers to get you started. You'll find a full list at Microsoft's Windows 8 keyboard shortcuts page. Also keep in mind that most of the shortcut keys that you've come to know and love over the years still work: Alt-Tab to switch between running applications; Ctrl-Shift-Esc to open Task Manager; Ctrl-Z to undo and Ctrl-Y to redo; and Ctrl-C to copy and Ctrl-V to paste.

10. Use multiple monitors

Windows 8 adds some nifty tricks for using multiple displays. For the first time, you can span a single desktop background (wallpaper) across multiple monitors. You can also have a taskbar on all your monitors, and open the Start screen from any of them, and even have different wallpapers on each. The corner hotspots are enlarged for multiple monitor setups, so you don't have to move your mouse all the way to the rightmost corner of the rightmost screen to invoke the control Charms – you just move it to the corner of the monitor its currently on. Check out our Windows 8 multiple displays guide here. Also, do note that you can only run a new-style app on one display in a multi-monitor setup.

11. Navigate the two IEs

Duality is something you need to get used to if you switch to Windows 8, and Internet Explorer is a prime case in point. The full-screen, new-style incarnation of Internet Explorer 10 is the one you'll see when you hit the blue "e" tile from the Start screen, and according to our security expert, Fahmida Y. Rashid, you're well advised to use this one. That's because new IE doesn't use plug-ins such as Java, which has recently been the subject of vulnerability news. You'll need to get used to the way full-screen IE works: A right click opens the address bar at the bottom, and typing into that opens tiles for pinned and frequently visited sites.

12. Set up child accounts

If you're sharing your PC with your offspring, Windows 8 offers an easy way to set up Child accounts that let you block websites and set time limits for usage. After choosing Add User in the Users section of the new-style PC Settings page, you'll enter an email address for the child's account, and then tick the "Is this a child's account…" check box. You'll then get a Welcome to Family Safety email in the account you use to log onto the PC with. This email links to a page where you can set the website and app filtering options, and how often you want usage report emails.

13. Don't shut down

People used to complain that it was counter-intuitive that you had to shut Windows down from the Start button, but in Windows 8, the shutdown option is even more obfuscated: It's found in the Settings Charm, under Power. This button lets you truly shut down, but also offers Sleep and Restart options.

The reason this facility is far from the surface of the OS is because Microsoft doesn't want you to fully shut the PC down. Just closing the top of a laptop or hitting the power button on a tablet will put the device into a very-low-power sleep state. If the battery is near dead, Windows will actually shut completely down. Desktop users will have to go through the Settings, Power menus, or just let the machine sleep after a period of idleness based on the desktop Power Options plan. Just type "power options" from the start menu to open the desktop Control Panel and choose "Change when the computer sleeps" to adjust this time-out.

14. Refresh your PC

Though Windows 8 is noticeably faster than its predecessors, Microsoft has added an automated way to get your PC back to a pristine, speedy condition. The "Refresh your PC without affecting your files" option is found in the new-style Control Panel near the bottom of the General section. One drawback to this, though, is that you'll lose your desktop apps, though new-style apps will be saved. Then again, if you've bought a new PC with a load of preinstalled software you don't want, this tool is a boon. An even more drastic approach is the "Remove everything and reinstall Windows" option just below the refresh choice. This is a big help if you want to pass the PC on to a new owner. You can read about the details of both processes in my guide to refreshing or resetting your Windows 8 PC.


15. Use File History

Windows has had a backup feature for years, but this time around, Windows 8's new File History feature gives users something akin to the Mac's Time Machine. By default, at the end of every hour File History saves copies of everything in your libraries (Documents, Music, Pictures, Videos), desktop, contacts, and favourites. You can use an external or network drive for these backups. After setting up File History, you'll be able to retrieve any previous version of a file saved at the hourly interval. You can preview the earlier versions in the restore dialog, and either replace the existing file with the backup version or keep both, by choosing "Compare info for both files."

A guide to refreshing or resetting your Windows 8 PC

A guide to refreshing or resetting your Windows 8 PC

It may seem odd for an article to be telling you how to "refresh" your Windows 8 PC before the operating system is even publicly available in its final release form. But if you think about it, when you buy a new Windows PC, you'll often find a slew of programs you didn't really want – game trials, utilities, and more. So it's a boon to PC users of the new OS that the latter offers a way to clean out everything non-essential.

There are actually two new Windows 8 capabilities that perform different kinds of cleanup: One refreshes the system while keeping all of your photos, music, and personal files. The other actually starts you over, returning your computer or tablet to its mint condition. The latter – resetting – is also an excellent choice for when you're selling, recycling, or gifting your PC (something friends have often asked me about).

Resetting a Windows PC prior to Windows 8 had been a bit of a chore, so these new Windows 8 tools offer long-term benefits. And if you're not giving away your PC, the refresh tool is a much simpler alternative to reinstalling the operating system in the traditional way.

Refresh

Both of the new Windows 8 options clean out the operating system itself, but the "Refresh" choice leaves intact your data – photos, music, videos, documents, your new-style Windows 8 apps, and your system settings. You'll find this choice by clicking or touching the Settings charm (you bring up the charms with a swipe in from the left on a touchscreen, or by moving the mouse pointer to either of the right-hand corners and moving it down or up). Then choose "Change PC Settings" at the bottom.
When you're on the new-style "PC settings" page (see the screenshot below), choose the General section, and scroll through the right-side choices down to the eighth choice, "Refresh your PC without affecting your files."
To get started with the refreshing process, click or tap the "Get started" button below the Refresh description. You'll then see a screen like this:
This provides more detail concerning what the operation does. A key thing to know is that the process will remove any desktop apps – only apps obtained from the Windows Store will remain. This message states that you'll be presented with a list of the removed apps on your desktop after the process. This removal makes sense, since desktop programs are the likeliest suspects for clogging your system, and they haven't passed through the Windows Store vetting process. For a (somewhat geeky and time-consuming) way to perform the refresh without losing desktop applications, see our guide entitled "Reinstalling Windows 8 without losing files and programs" (bear in mind that you need to be comfortable with command lines).

Preparing

Hitting Next launches a process that displays a "Please wait" message and a spinning timer below the word "Preparing." After getting to this point, I next received an "Insert media" message, requesting that I insert Windows installation or recovery media. This is a little bit of a drag, since it would be nice for the refresh to be a self-contained process. I plugged in a USB stick with the Windows 8 installer, and received the message "Please wait…Verifying."


Now my tablet was ready to be refreshed. I knew this because the bar across the screen read "Ready to refresh your PC." And the more detailed text below that told me that it would take a few minutes, and that I should keep the PC plugged into a power outlet. The button to press now simply read "Refresh." So I pressed it.


The computer restarted, and acted like it was installing updates. (I had just previously installed actual Windows Updates). I then saw the new Windows logo and the words (again) "Preparing to refresh your PC." After this it said "Refreshing your PC" with a per cent amount displayed. (This stayed on 5 per cent for quite a while). The process took 8 minutes, after which I saw another timer: Getting devices ready.

Then my lock screen appeared and I had to sign in with my Microsoft Account password – even though I'd set up a quicker four-digit PIN sign-in. So that's one setting that apparently isn't saved. The process then showed the same mini-tutorials on how to use Windows 8 – swipe in from the sides on tablets, and move the mouse pointer to the corners – as I'd seen on first installing Windows 8.

Shutting down and starting up again, I could switch sign-in options back to my PIN, which actually was remembered. Also my mail, Wi-Fi, and location settings were stored and remembered, so right away I could see how many new emails awaited me, the local weather, and Wi-Fi bars all on the lock screen. And sure enough, all my Metro apps were still on the Start screen. Moving to the desktop, there was a new icon called "Removed Apps." As it turns out, I only had Firefox installed, and that was on this "Apps removed while refreshing your PC" list.

Resetting your PC

This is the option to use when you're giving away or otherwise disposing of the PC. As with Refresh, you get started by choosing the Settings charm, then "Change PC Settings" at the bottom, then you select General, and scroll down to "Remove everything and reinstall Windows." Click on or touch "Get started." You'll see a band across the screen entitled "Reset your PC."


Hit Next. You'll see "Please Wait… Preparing." As with the Refresh process, I was then asked to insert Windows 8 installation media. And again, I think this should not be a prerequisite for the Reset option. This time, a different pair of choices presented themselves: "Just remove my files," and "Fully clean the drive." The first just takes a few moments, while the latter takes "much more time," according to the info on the button.


First I tried the "Just remove my files" option. The resulting note told me that all apps and files would be removed, and that settings would be restored to default. There was also a note about making sure your File History drive is up to date; this is Windows 8's new backup solution which will be the subject of a future article.

Next, hit the Reset button. A restart is triggered. The same Preparing message appears with the new Windows logo. This time, after just over eight minutes, I was presented with the Windows license terms to accept. Then the first-run setup began – choosing colour themes, naming the computer, connecting to Wi-Fi, and Microsoft account login (a Hotmail account works). It was exactly what you get when you first set up a Windows 8 system. Next, you see the tips on how to navigate Windows 8. After a psychedelic colour-rotating "We're Getting Your PC Ready" screen, the Start screen pops up.

There was nothing on my desktop this time, save the Recycle Bin, Internet Explorer's icon, and the Windows Explorer folder icon. But since I signed in with my Hotmail account, my new-style apps and email notifications were all restored. The takeaway from that is, even if you completely wipe your PC, you can still save yourself from having to set everything up, by signing into a Microsoft Account.

Finally, I tried the full reset. Since my system had just been cleaned, I didn't expect it to take a whole lot longer or reduce the disk footprint significantly. The initial resetting process did take much longer, at just under 38 minutes, and I arrived at the initial Windows 8 setup screen (the license agreement) after one more minute. This is because, unlike Refresh, resetting actually erases and formats the hard drive partitions and writes random data to erase yours before reinstalling.

Powerful, with caveats

I applaud Microsoft for giving users these new ways to refresh and reset PCs: It's something that's long overdue, considering the experience of Windows users dealing with clogged machines for years. The processes work as advertised, but my only concern is that, in my case, installation media was required to complete them. Whether or not Microsoft can eliminate this requirement, at least we'll now have some recourse when a PC becomes sluggish and cluttered with unneeded apps, or we want to pass the machine on.

Reinstalling Windows 8 without losing files and programs

Reinstalling Windows 8 without losing files and programs

With Windows 8, Microsoft has taken the need for improved backup and restore functionality to heart. A new utility aptly named “Refresh” is included with the upcoming operating system that is set to make those annual Aliens-style “nuke it from orbit” re-installations of Windows and applications as easy as possible.

Out of the box, Refresh will allow you to easily reset the operating system to its original state without deleting your Metro applications, personal files, user accounts, or the settings configured during initial setup. Also saved are network connections, BitLocker (and BitLocker To Go) encryption settings, and drive letter assignments.

On the other hand, desktop applications will be removed, and firewall settings, file type associations, and display settings will be reset to defaults. According to Microsoft’s Building Windows 8 blog, the refresh function does not keep the above mentioned data by default because it is the software most likely to cause performance or stability issues.

At a basic level, Refresh is a differential image backup that keeps track of the data added to a base Windows installation. When run, the tool acts as an overhauled System Restore by re-installing Windows and then restoring the backed up data automatically to bring your PC back to its “default” state.

How to save your desktop apps with Recimg

Refresh can be further tweaked with a command line tool called Recimg. Using this utility, it is possible to create your own baseline image that Refresh will use to restore your computer.

This would allow you to install Windows, run through the initial setup, create user accounts, install all of your favourite applications (both desktop and Modern/Metro), and configure/personalise the OS. Once you have your computer set up the way you like it, you can create a custom image that will preserve this state should you need to restore the PC. This functionality has been possible with third party tools for some time, but it is now built into Windows – and is much faster than doing a restoration of a full disk image using Acronis (or the like).

The downside is that you need a Windows install in place before you can restore your image, so it becomes less handy if your hard drive dies and you need to restore to a new drive. You would need to install windows and then allow Refresh to re-install Windows plus your saved changes. Because of this, the Refresh image should not replace your normal backup strategy.

Despite the limitations of the differential backup – including incompatibilities with some desktop apps (an issue Microsoft is working on addressing) – using Windows 8’s Refresh will have you up and running again in less than half an hour. Furthermore, while it does involve using the command line to set it up, it only takes a few simple mouse clicks around the GUI to actually perform a restore, making it a definite boon for family tech support.

Creating your custom baseline image

After installing your favourite applications and getting the operating system set up the way you like it, you need to create a new image that will become the new baseline for Windows 8’s Refresh tool. Unfortunately, there is no GUI method to do this out of the box (there are third party Metro apps that can do it, however). Open a new Administrator command prompt by searching for “cmd” on the Start screen, right click the command prompt icon, and choose “Run as administrator.”


Now you will need to run a simple command to create the new image. Type the following command:
recimg /createimage E:\BACKUPS\
And then hit the Enter key.

The location “E:\BACKUPS\” in the above example command can be replaced with any directory of your choice. You can choose a directory on any connected drive and the Recimg utility will create the folder(s) for you as needed.


After hitting Enter, the Recimg utility will write a new image file, and then register the new file with the Refresh program so that it will use the custom image rather than the Microsoft-provided default when run. Depending on the amount of data the tool will need to write for the differential backup, it could take a while to complete. Once finished, Recimg will display an operation successful message. As of the RTM release of Windows 8 (see our in-depth look at RTM here), the tool states the following when an image is successfully created: “Recovery image creation and registration completed successfully.”

If you browse to the directory you used in the above command, you will find a new file named “CustomRefresh.wim.” The exact size will vary, but you can expect it to be at least several gigabytes in size. While Windows’ built-in zip/archive manager cannot open the “.wim” image file, 7-zip is able to open the archive (it cannot add items to it, however). Currently, the image file contains the following folders and files:
  • Documents and Settings
  • MSOCache
  • Program Files
  • Program Files (x86)
  • ProgramData
  • Users
  • Windows
  • bootmgr (file)
  • BootNXT (file)
  • hiberfil.sys
  • InstallRPLog.txt
  • pagefile.sys
  • swapfile.sys
The inclusion of hiberfil, pagefile, and swapfile “.sys” files is curious, however it is otherwise a straightforward backup.

That is all there is to the recovery-image creation process. It may be a good idea to include that CustomRefresh.wim file in your overall backup strategy. Should the original file be lost or damaged, you can place the backup in the same location and have it work. To verify, you can open a new command prompt window with administrative privileges and use "recimg /showcurrent" to display the currently configured image directory. To change this, you can use "recimg /setcurrent E:\BACKUP\" to register the new location of the CustomRefresh.wim file.

The restoration process is done using the new Refresh tool located in the “PC Settings” Metro application, or the Windows 8 recovery environment (if the PC is unable to boot into Windows properly). Either way, it is a straightforward process that can be completed without the use of the command line.

Refresh recovery

Now that you have a custom baseline to work from, you can use it for routine maintenance or to recover from a malware infection to get the computer back to a clean and speedy state. If Windows won’t boot, you will need to employ the recovery environment (Windows RE) and choose Refresh from the Advanced Options menu. (Tip: You can manually get to the WinRE startup options by using Shift+Left Click (tap) on the shutdown icon. Otherwise, it should automatically boot to WinRE if Windows’ normal startup fails).

Barring such extreme circumstances, you will be able to initiate the refresh process from within Windows 8 (in the PC Settings app). To do this, open the Charms menu by moving your mouse cursor to the upper right hand corner of the screen – or swipe in from the right if you have a touchscreen. Move your mouse over the Settings icon (which resembles a white gear), and click to bring up the Settings menu in the sidebar.


Now navigate to the lower right hand corner of the screen and click on the “Change PC settings” link.


This will bring up the Metro UI version of Control Panel called PC Settings. On the left side of the screen is a list of text links. Click on “General.” Now, on the right side of the screen, scroll downwards until you see the “Refresh your PC without affecting your files” header text. Directly beneath that text is a box with text that reads “Get started.” Click on that to start the Refresh tool.


The Refresh PC wizard will now open. While it notes that applications you installed from websites or discs (otherwise known as traditional desktop apps) will be removed, you can safely ignore that point if you’ve used Recimg – barring any incompatibilities, which we’ll discuss in a moment.


To begin, click on the “Next” button in the overlaid dialog. It will then find the image it needs and give you one last chance to back out of the process. Clicking Refresh will start the restore process.


After a few minutes, your computer will restart. During boot, the blue Windows logo will appear above a progress indicator that shows the percentage completion for the restore process.


This will take an additional few minutes. Once finished, you’ll be shown the initial setup tutorial animation, but you won’t have to go through the user account creation or other setup processes. Instead, you’ll be taken to the Start screen.

At this point, you should have a clean system with your customised settings and all of your favourite Metro (Modern UI) and desktop apps.

Refresh is speedy, but not yet perfected

Unfortunately, the process is not fool proof. Any applications that Windows wasn’t able to restore will be listed in a new file on your desktop called “Removed Apps.html.” When I performed a refresh with a custom image, Google Chrome, Dropbox, and (curiously enough) Microsoft SkyDrive all got left behind – and required a re-install.


Furthermore, if your desktop applications do not store user settings and other data in the folders that the Recimg utility pulls data from (to create the differential image), you will have to reconfigure them. In my case, I lost saved login credentials (and saved games) from Project CARS and Minecraft.

Also, Outlook 2013 (and the rest of the Office 2013 Customer Preview suite) was reset, and I lost emails (I did have backups, at least) and account data which needed to be reconfigured. Utorrent was also reset to default settings. Finally, similar to the case of installing Windows 8 over a previous version of Windows, files that are not carried over to the new (rolled back) state are placed in a “Windows.old” folder. This folder can be safely deleted, though it would be a good idea to check for personal files that might not be backed up elsewhere.

Microsoft has acknowledged that there is room for improvement with the Refresh tool, and it’s considering adding locations to pull data from (to improve compatibility) based on user feedback. My testing was done on the RTM build of the operating system, which means the issues I ran into will only be fixed via a Windows Update patch.

Despite still being in development, Refresh is proving to be a useful tool that is simple to use and provides quick system rollbacks without impacting personal files. There is still some work to be done to improve desktop app support, but when used with a custom image, Windows 8′s Refresh tool fills an interesting middle-ground of an overall backup strategy between traditional file backups and full-disk imaging using third party tools.

How to Utilise Multiple Displays in Windows 8


How to Utilise Multiple Displays in Windows 8 
One of Windows 8's improvements over its predecessors, for both the new Metro user interface and the traditional Windows desktop view of the operating system, is how flexibly it now supports multiple monitor configurations. And for the very likely Windows 8 scenario in which a tablet is used at home and on the road for pleasure, and then docked with a desktop setup including a larger monitor and standard keyboard for serious work at the office, robust multi-monitor support is a must.

Key new features for multiple monitor setups in Windows 8 include the ability to have the Taskbar on each monitor in an extended display, and to stretch a single wallpaper across several monitors, or use different wallpaper on each. Perhaps most importantly, it’s possible to run Metro apps in one screen and full Windows desktop apps in another, side by side. Microsoft has also put some effort into making multiple monitor setups usable with the mouse and keyboard, via elements such as hot corners. Let's take a look at all this in more detail below.

Setting up multiple monitors

You can get started with multiple monitors either from the Metro or Desktop interface. With the first, you invoke the Windows Charms by swiping in from the right or moving the mouse cursor to one of the right-hand side corners, choose Devices, and then Second Screen. After this, you'll get four choices: PC screen only, Duplicate, Extend, and Second screen only. The only choice of real interest here is Extend, since the others all result in a single display or multiple identical displays.


In the traditional desktop mode, you do what you've always done: Go to the Control Panel's Screen Resolution page, which is under Appearance and Personalization > Display, and then make the same Extend, Duplicate, or single display choices. But you'll probably want to go to this control panel anyway – if you want to change the relative positions of the displays, or change the primary display, it's the only game in town.

Taskbar choices

Not all of Windows 8's multiple monitor configuration options appear in the Display control panel. For instance, the possible selections for how the Taskbar is displayed on each screen aren’t here. To get to these new settings, right-click the Taskbar on the Desktop and choose Properties from the context menu. In the resulting dialogue box's Taskbar tab (the default one), you'll see a new checkbox choice: Show taskbar on all displays. Further refinements let you show all taskbars on all displays, the main taskbar and buttons only for apps running on the current display, or only the taskbar for what's running on the display at hand.


One thing you won't ever see on secondary monitors, however, is the system tray, with its indicators of Wi-Fi signal, time and date, battery charge, and volume level. The ability to move or duplicate these among multiple displays would make Windows 8 multi-monitor support that much more powerful and useful.

Span wallpaper across monitors

There are other choices for multiple monitor setups which don’t appear in the Display control panel under Windows 8, such as how wallpaper (or “desktop background”) is displayed over multiple screens. You can access these options from either Metro or Desktop. In the former case, start typing "wallpaper" or "background" at the Metro Start screen, select Settings, and choose "Change desktop background" from the results.
From the Desktop, just right-click anywhere on the background and choose Personalise to get to the same options. The key to what's new here is the Span picture position choice at the bottom of the dialogue. This lets you extend a single image across multiple screens, rather than duplicating the same background on each. Of course, you can still choose the repeated background if you wish, and whether to stretch, fit, fill, tile, or centre the wallpaper image.
Another fresh option in Windows 8 is to choose a different background for each display. To do this, in the same Personalisation/Desktop Background dialogue, you right-click a background image's thumbnail, and a choice of your numbered monitors pops up. Simply click the monitor you want the current image to display on. Be warned, I did find it a bit tricky to change settings like stretch and tile per monitor – sometimes the second monitor's background would change when I just wanted to stretch the wallpaper on the first one.
Use the hot corners

When using the traditional keyboard and mouse setup on a Windows 8 PC, the corners of the screen are of paramount importance when it comes to working with the new OS' interface. Moving the mouse to the top left corner reveals thumbnails of other running apps, the top and bottom right corners bring up the "Charms" (or basic icons for Search, Share, Start, Devices, Settings), and the lower left corner opens the Metro Start menu. But what happens when your display spans across multiple screens? Where are the corners?

Microsoft has introduced “hot corners” to solve this problem. Essentially, MS has padded the target area in the corners under a multi-monitor setup. This means you don’t have to land the mouse cursor in the exact corner pixel in order to invoke the start screen, charms, or other action the corner triggers. In practice, the larger six-pixel target area made it easy for me to get to these hot corners.

Swapping metro monitors

So, while the hot corners give you access to the Metro start screen at any time (which, remember, can also fire up Desktop apps), what if you have a Metro app running on one screen, say a smaller one, and want to move its display over to your bigger monitor? A new shortcut makes this a snap: Windows key-Page Up or Windows key-Page Down does the trick. It even reconfigures the Metro start screen tiles to better fit the new monitor's size.

But there is one capability which I’d find extremely useful that’s missing here. There’s no way to use one (likely smaller) monitor to house the start screen, and have it launch apps to the other screen. This way, I could just leave a smaller screen, say that of a tablet, for program launching, while doing the real work on the larger monitor.

Extra screens for every Windows 8 PC

As is the case with many professionals, I use a laptop as a primary work PC, and it usually remains docked to a desktop setup including a large monitor and full-size keyboard. With Windows 8's push towards being a hybrid tablet/desktop operating system, this scenario takes on greater levels of importance. And because the tablet’s even more portable, there's a far better chance that I'd actually pack the device into my backpack on the way home, using it for personal pursuits like consuming entertainment, news, sports, as well as playing games and communicating with friends and family.

While it's not completely lacking in limitations, the greater flexibility and power of Windows 8's built-in multi-monitor support is unmatched by other tablet operating systems, and could be one of the keys to its success.

Friday, March 1, 2013

Microsoft My Server App For Windows 8 / RT Released

The release of Windows 8, has, quite inevitably been followed by the release of Office 2013 and Office 360, but this time around, the Redmond company has been hard at work on several other apps as it tries to establish its new-look operating system across its vast user base. The Windows Store needs as many decent new apps as it can get, and today, another in-house offering arrives in the form of My Server.

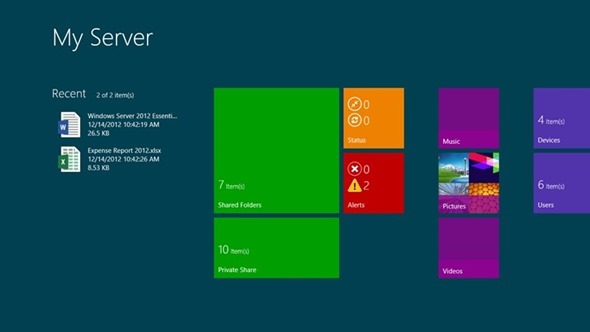
My Server supports Windows 8 as well as Windows RT, and allows users to access and edit shared files on servers powered by Windows Server 2012 Essentials. Other benefits of My Server include the ability to search and locate documents on Windows 8 / RT devices and machines, as well as the shared folder of the server.

Screenshot.6894.1000000

One of the more riveting features is the ability to access a recently-opened file, regardless of whether the app is connected to the server, and My Server is also a great administrative tool thanks to its ability to manage users, devices, and alerts on the server.

Screenshot.6894.1000001

As you would expect, full support for streaming media playback from the server is supported as standard, so if you just use your server for catching your favorite movies or TV shows, for example, this app could be a necessary download.

Screenshot.6894.1000002

Rather than sitting back and waiting for third parties to deliver new apps adapted to the tiled interface, Microsoft is taking matters into its own hands and creating some fine Windows 8/RT apps of its own. Back in January, the software maker released its Dynamics Business Analyzer app, and all of these smaller releases seem hell-bent on ensuring businesses, server operators, and general users adapt to the new OS as quickly and smoothly as possible.

Screenshot.6894.1000003

Indeed, a similar app was recently released for those on Windows Phone, and although this offering looks, as one might expect, even more powerful, it would appear as though Microsoft seeks the kind of cohesion and mobile-desktop harmony enjoyed by Apple’s OS X / iOS range.

It’s refreshing to see Microsoft pumping out apps at such a rate, and long may the trend continue. If you want to grab the My Server app, you can do so via the link provided below.

(Source: My Server for Windows 8 on Windows Store)

BlueStacks Android App Player For Windows 8 And Surface Pro Released, Brings 750,000 Mobile Apps

BlueStacks has built its solid reputation on providing software which enables Android apps to run on a variety of different platforms besides Google’s. With the Windows beta version released last year to some 5 million+ downloads and the OS X beta arriving just six weeks ago, the BlueStacks team has now compiled a version adapted to the relatively-new Windows 8 platform, as well as optimization for the Microsoft Surface Pro. Details after the break.

Running such apps on Windows and Mac is one thing, but in order to fully emulate the experience of using apps and playing games on an Android, it’s better to run an emulator tool like BlueStacks on a touch-based device. The Surface Pro, which is proving to be a popular device, having exhausted its initial batch of the 128GB storage configuration, would seem the perfect candidate for some BlueStacks treatment, and thanks to this new release from the Silicon Valley-based outfit, enjoying the three quarters of a million Android titles on Microsoft’s highly-anticipated slate.

BlueStacks_Logo

It’s amazing to think that BlueStacks, as a company, is scarcely two years old, and yet in such a short space of time, has achieved so much. Millions have gone ahead and downloaded BlueStacks beta for Windows and Mac, and with this new version also catering to the swiftly-adopted Windows 8, I would expect that same trend to continue once more.

Intriguingly, the company also recently signed a distribution deal with a slew of PC OEMs to pre-load the BlueStacks software onto over 100 million PCs during the course of 2013. Considering Android’s already expansive reach in mobile space, the move will not only enhance the user base in terms of numbers, but it will mean Android developers need not port apps separately for the Windows platform.

BlueStacks Windows 8

Having given the beta a whirl on my Mac back when I covered it in December, I have to say, I was very impressed by the responsiveness, and general smoothness of the whole experience. If it is half as good on the Surface Pro as it has been so far at desktop level, it’s fair to say BlueStacks could be a game-changer in terms of how we deal with cross-platform experiences.
You can download BlueStacks for Windows 8 from here.

How To Set Up And Use File History In Windows 8 For Data Backup And Security

There are certain changes in Windows 8 that are far better than any other previous Windows version. With any operating system, or any other device that stores your personal data, the most important thing that users are concerned about is data security. You need to protect data from malware, external attacks, hard drive crashes, corruption and what not. While there are a lot of tools out there that help you achieve all that, nothing beats the usefulness and importance of taking backups of all the important files that you have. 

The problem with that, however, is that you need to manually set up a data backup solution on your Windows PC. You may even need to download a third-party application and configure it as per need for an easy-to-use solution. With Window 8, Microsoft decided to make things much easier with the introduction of File History. Although similar to Shadow Copies and File Versions from previous iterations of Windows, the concept that File History adheres to is much akin to Apple’s Time Machine in OS X. You configure an external storage medium – networked drive, external hard drive or USB – and Windows 8 will continue backing up your personal files and data to this location at pre-defined intervals. 

Windows 8 logo

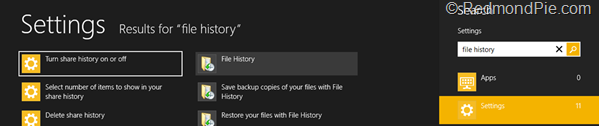
File History is not enabled by default, so you’ll need to start it first. You will also need an external backup drive attached to the machine before doing so. To do so, hit the Start button and search for File History. Under Settings in the search results, you’ll find your required option.

File History

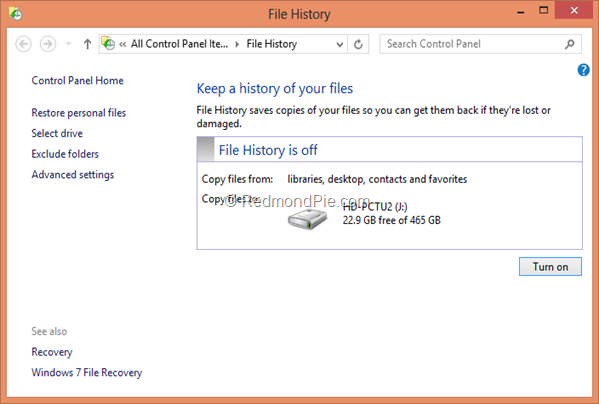
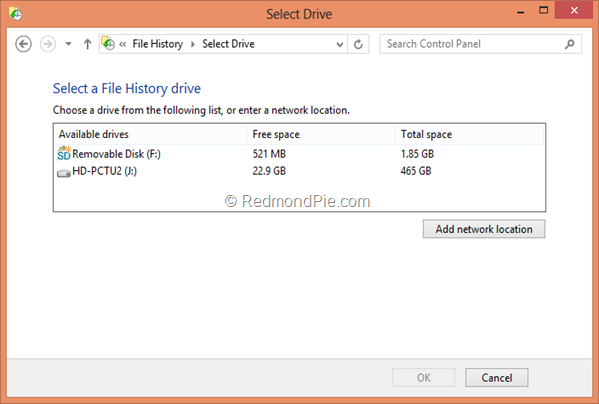
You’ll notice that File History is off, and a Turn on button is available at the bottom of the panel. The system will automatically select the drive with most storage available, if you have more than one configured or attached.

File History Control Panel

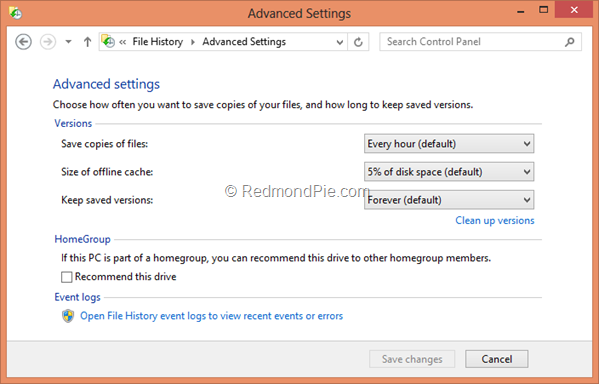
Under default conditions, File History will back up copies of your personal files after every hour, and will indefinitely keep the previous versions. By personal files, we mean everything included in your user folder in Windows 8. However, you may choose to exclude individual folders and locations if there’s something not that important. The backup location can be changed as well, based on need.

Select Drive

All other configuration settings are available under Advanced settings, where you can change the backup interval, size of the offline cache (set to 5% of available disk space by default), and for how long to keep the saved versions of files. If you have a HomeGroup set up and the drive is attached to your PC (physically), you may recommend it to other users of the group for File History, as well.

Advanced Settings

File History is one of the lesser known features in Windows 8, and definitely one of the best ones that Microsoft has come up with in a while. The utility works the best in networked situations, or if you have a spare external hard drive available that all members of your HomeGroup could use for their backup needs. Combine it with BitLocker to protect the backed up data, and you have a pretty perfect solution available for your data security needs.